
Doesn't look like much but with what I did today, I could even make some new covers for those old fairy tale books of long ago that seem to have lost their fronts or backs or just are like wobbly old teeth. Using book cloth and the signature blocks I spoke of in my last blog, today I will finish up a series of books right down to signing a colophon to make it all official.
Before I started working on my covers, I unwrapped the signatures from yesterday and found them to be nice and square and the glue had hardened well. Since the signatures were larger than the actual size that I wanted for my books, careful measurements were taken and then the books were trimmed to size. A very sharp xacto knife will work, but after throwing too many blocks in the trash, I found a large size cutter to make my edges nice and clean. Now that the books have been cut to 6.75" x 6" it is time to choose some book cloth, cut the boards and spine and put it all together.
Lets cut the book boards. First one measures the book or signature block very carefully. The example today will be 6.75" wide by 6" tall. I will be using these measurements to determine how large the book board will be. The width of the book board will be the same measurement as the text block is or 6.75." The height of the board will need to be larger so the edges of the books will be protected from dust and well it just looks better when there is an .127" on both the top and bottom of the board. So, yes all that is needed is to add .25" to the height of the book block or 6 .25. " (If the measurements are close as in this book, I will put arrows denoting direction on the book board- you guessed it- too many times I have tried to glue the text in and found I had - well you know what I mean ;-) ) Two book boards-front and back- are cut for each book. Next the measurement of the spine is taken and another very thin piece of board is cut- almost like double weight card stock to add support to the spine. The measurements for the spine will be the actual width of the spine block and the height of the book board not the book block. Remember check things out before cutting. The width of thin books is determined by laying the back or spine on the thin weight board and draw a line on each side and then measure and draw nice straight lines. Scratches head. I hope that all made sense.

Most any kind of paper will make a nice book cover, but I prefer to use book cloth for one reason or another. When I make up some artist sketch books, I will choose wonderful handmade papers to add to their beauty, but in most books book cloth gives a very professional addition. Book cloth comes in many forms, some backed and some with only starch as a stablizier. The backed linens are very easy to use but one gets a better fit with starched, but it can be cranky. The width of the book cloth will be as follows. 2 book board widths, the spine width plus .5 " plus 2 inches. For this piece that will be 6.75" + 6.75" + .25" (that is the spine width) + .5" (when we lay it out this .5 " will become a gutter of .25" on each side of the spine) + 2" that will be used as a fold back onto the board. When I do the math the width of the book cloth should be 14 .25". The other demention will be the height of the book board or 6 .25." To that measurement add approximately 2" for turn ins. So the piece to be cut would be 14 .5 " by approximately 8 .5."( I could add a little more, but not less.) Now, if this was just too confusing, I just lay all the parts plus the gutters on the book cloth give .75" or so on all sides to fold in and cut. Check the illustration above.
Oh, this is always a favorite part for everyone. Let's use glue. When using glue, first of all make sure it is in a consistency that spreads well, does not soak the paper or fabric. Gluing is supposed to be done in a circular motion-from center to edges. This can be a bit tedious on larger sheets that are not square, but start out in the middle and then wing it from there. Once the paper or cloth has been covered with glue, the paper or cloth will begin to curl. This is very normal and if you wait for just a bit longer, I have heard that it lays back down. I never seem to wait that long to see if that is true.
Before applying the glue, I make two tiny marks at the top and bottom of the cloth where the spine will be placed. Now, I apply the glue and place the spine right down the center leaving the turn backs equal on top and bottom. Next, the boards will be laid on the glued up cloth .25" from the spine. This is important and needs to be a nice straight equal distance from top to bottom on each side. I then place the boards down, press lightly and turn back the edges of the cloth onto the board. I like to make little squares at the corners so it looks nice. Laying the cover down and letting it dry well before gluing the text block in.
Here are two finished covers with the signature block in the background. The white is the spine.


The signature block will be glued into the cover when the cover has been left to dry. I take the cover and place the signature block into it so the spine fits snuggly to the board spine. The bookis put together and to see how it fits. The end page will be glued to the edge of the cover .25" in (this is the side edge.) The top and bottom edges will be .127 or close. A scrap piece of paper is put between the two end pages so when you put glue on that back page it will not get into your text block. Once the glue has been applied carefully, I slide out that sheet and put it right away in the garbage. Glue can be my worst enemy when Iforget to cleanmy area. I always have a damp cloth near by for fingers, table and rulers.
Next I place the end page gently on the board and then pressing the end page firmly into the book board checking all your edges and making sure they are nice and straight. I continue in the same manor for the back end page. Now, I take my finger and go back and forth on the gutter areas making sure they are straight and have no wrinkles in them.I Run my finger back and forth making a slight indentation. This is the hinge of the book and some detail should be spent on this.


It is really nice to have a crimping setup for the hinge. If you notice in the above illustration the spine of the book is sitting ouside of 2 brass plates that fit into the gutter to crimp the book hinge together. The book is left in the press until the glue has set in order to get that nice crimping for the hinge that makes the finished piece look so professional. Add a nice title page, sign the colophon and this mission has been completed. Now if only these were the only books I had to make. Over the next several days, I will continue to work on my reproduction titles. I believe the next blog will be on sewing up signatures or how about how to make an artist sketch book.

Well, it will give me something to think about as if I need to think more. So until then find peace and kindness or give it a whirl and if not-
See you around town,
Janet

 On the third page, the theme of how much can one manage to put on one page begins to unveil itself. As you can see, my love for using transparent papers for words and pictures has already started it's development.

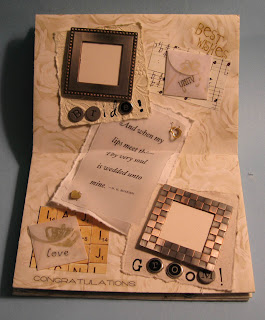 This last page just goes on and on. This page was fun to hammer out the little heart signs and to use the old slide holders for pictures. Each picture frame is for a special moment during the ceremony and once again a quote that only on a wedding day should be read.
 One last hidden place to be found in this little book. The book was constructed to include an envelope behind each page, that was to be discovered by opening the spine of the book. If you didn't get the picture don't worry-it never got made either. The next shot is of those envelopes and as you can see, even little quotes were hidden in there.
 If the book was ever to have been completed, there would have been a few more pages that now remain blank. The service, the reception, the honeymoon and the first apartment would have been included on the last of the pages. Thinking about all that stuff makes my head spin and perhaps that is why it was never completed. Who knows why art people never finish some things. Shrugs.


 Books are usually sewn at a sewing station. This tool has been around for a long time and still works pretty much the same way as the original designs. Signatures are sewn together and on tapes. The linen tapes and linen threads used to put the text block together are strong and do not stretch so the book stays in proper shape for a long time. The tapes are used to tighten the signatures and then frayed to be glued between end pages and covers. For informational purposes, I inherited this lovely tool and I cannot find the exact set up so I figured out how to make it work for me so if it does not look correct, it most likely is not correct. ;-)

 It will be another process to add some endpages and make the covers, but if you keep tuned in I will have pictures before too long. Tomorrow is going to be a break day and I hope to do a couple of silks.


