Friday, August 28, 2009

Pondering-What is art? Beeteeno Cei3woo Hotii


At the present time, I am deeply involved in a piece called "Beeteeno Cei3woo Hotii" or translated "The Spirit Wagon" that just happens to be at a point where I could step back and say finished; however, I will see it through- even producing some sort of watercolor that will be publically viewed and a book of great Native American sayings with more Curtis photos and a foreward to introduce the piece and to discribe it's purpose.

Is this project art? Perhaps a construction with a reuniting of one's self with the past- a joining of my ideas with a great photographer Edward Curtis and his documentation of the Native American. Is this art or craft or both or is it a journey for me to release these spirits back to the earth by an individual who fears much of a great culture has vanished - to remind people of the spirit that came before us in this great land? It has become a journey using art and craft -the journey filling me with a purpose of who I am and where I fit in on this planet.

So what about the ability to use free domain art work without restrictions in current art pieces? This brings up the delimma as to whether the art work or piece can be considered art and if it is marketable. I find what I do to fall right in the middle of this. I have reformulated many out of date books and have tried to even sell a few; but so few of the public cares. It appears to me that the public prefers how Disney does it today. I would not call these reconstructions of mine "originial art" but an "art-craft" with the wisdom and creativity of the original part of the mind that works to be pushed forward and to further have our hands create what our minds sees. This is just another way to keep the handmade book alive and well. There are only so many blank journals one wishes to have.

I want to allow people to take part in the wonder of books, words and illustrations that have gone the way of the broken back book and the Velveteen Rabbit. I find wonder and amazement when one turns a page to find new illustrations and words that can dance in our minds and create original visions. This format must never be lost. The illustrations and words of books that are no longer in print have great lessons to be found. Our culture needs to keep these wonderful images alive-complex pictures that enable the mind to search and learn. There is nothing so wonderful as a story- a story that stays alive in our minds forever.

I have no connection with the Native American and when I came across this collection, I found myself drawn to them-thinking about their lives-knowing so little and so much mystery to be embraced that I began printing them out and placing them around my desk. I guess I was beginning to know them. I heard their spirits - their joy and wanted to say thank you. Some seemed so sad, that I too wept.

Beetenno Cei3woo Hotii uses Eward Curtis's photographed images that were downloaded in their original format and were then cleaned up and cropped before printing and formatting into the hanging pages of the book. Further images showing Native American Life were transferred to the leather on the wagon to further show the culture and life of these peoples. Without these photos there would be no wagon. There would be no smiles or eyes to free again into their spiritual world. The piece is composed of my work and Edward Curtis'; however, the point of the piece is totally mine - the need to release spirits that seem to have left this world not knowing that man does honor thier ways and how they developed and kept this land safe and wonderful before "the immigrant white man." The"white man" who from fear decided that he needed all of their land and that these people who were not like them should be marched with tears to no land for no man.

The wagon is my way of releasing these peoples again to their earth. To rejoice in all that they left for me-all that I do not know that was blow in the dust. All that I can find again by allowing wind to blow my hair, and leaves to touch my feet, water to wash my face and sun to warm my body. I say thanks and oh my what a road was chosen by men who should have learned to share some land.

So back to the idea is it art. It is being created with nothing being asked in return. It is a journey between made and maker. It is an over filling of something that needs to be released in another way- is it art? I am sure some will say no it is just craft and to that I will smile as my handy hands do craft well- that precision where things are put together to give purpose to the idea that came first. Is not the idea art? Nothing can be all art unless one can call the skill of the craft art as well. Is not all art partially craft for the painter must know how to work the brush and have skill in doing it.

Are answers even important?

Post Script:
It has been several weeks since I sat at this computer and asked myself this question about using free domain work in one's art. My completed piece was submitted for jurying in the show and was accepted to include also a full sheet watercolor called "Fire Spirit." The reception was last Friday night and my piece was well viewed and at the ceremony to annouce the awards- my piece was named second place in the show. The show awarded 6 prizes to include first, second, third and 3 honorable mentions chosen from over 70 works. It pleased me to win- it should; but, the journey was truly the joy of the piece and getting to know the Native Americans who were so sadly subjected to the "white man's ways." If it is truly a piece of art and made only for the journey at some point the piece should be given back to the earth-that gives us our lives. Perhaps the demise of the piece should be by burning or left for the earth to retake through its crumbling. I will have to wait on that part.

Peace be with all mankind-it is what we need-be patient and allow man to be. We must learn to live with one another-we do not need to like each other, but we do need to learn to live among one another without hate.

Sunday, May 17, 2009

An adventure in showland

Well, it's history. Another adventure in showland. Once again the strategy became outwitting the rain and humid weather on Saturday and well Sunday show day was called at eleven after several hours of pouring rain. It continued to rain throughout breakdown and home again home again jiggity jig.
I could jump high as my pockets
were not over laden with coins. ;-)


The only given about a show is that you can not get in without paying your fees-after that it is anybody's call.
Well, since it is a blog, let's start at the beginning and stand by for a typical adventure of -

The life of the artisan-the modern gypsy of sorts.


I arrived on Friday afternoon about one in a light drizzle. I was assigned a nice neighborhood with some old friends and all of my new neighbors were pretty neat people and during this horrible breakdown in the small flood, everyone helped each other to get out. It made me remember how valuable our friendship is to one another. OH , back to the story line.

When I approached my new land lease, it became noticeable that the tent line to tent line was only about a foot at most apart from one another. I had the good fortune to have my neighbors tents on either side of me already set up. If you are an exhibitor who does out door shows, you know this is not a good thing. Here I stand having to squeeze my big tent into this spot. This was beginning to look like a challenge- the rain now beginning to sputter a bit more heavily. Perhaps this is really of no importance except for one of my neighbors. She informed me when I arrived, that I should set my tent over a couple of feet as she likes to use the sides of her tent to display other paintings. I replied, "Oh I need the 15 feet for my booth." Finally, after a wee bit of discussion, she became informed that there was no extra room and she was not happy. After such, the gods punished me for my small unkind thoughts and it began to pour down rain. Here we-go a pattern emerges.

Kelley arrives, the rains stop and we get the tent up, the floor in or as we call it "the boot" and around 6:00 we were out of there. There is something to say for those pop up tents and the screens that hook together for sides where one displays their art. (As an aside-my tent has rails around the bottom for stability and we draw up a tarp over this pole and lock it down with electric ties and many look at us like - "What the ..."-but it keeps moisture out and certainly rain. At night the moisture rises from the ground and gets trapped in tightly locked up tents and the work will happily absorb that moisture. That is why a floor is pretty important, but so few give detail to it.) Oh, the days of carrying heavy pots, never a worry about rain, just wind.


Saturday was a pretty nice day- lots of visitors and dogs. Many, many dogs. People should crawl around on the ground in a congested area and see if they like feet coming at ya- Just a thought- yanno? Well, some nice sales, lots of interest and loads of really great comments. It appeared my work was different from most and it was all good. As every artist knows there are so many stories one can tell during the course of a show - so many interesting people to chat with. Here are a couple of stories- alike but so different.

A gentleman appears to be very interested in a larger maybe 5 x 7" tan glazed leather journal with hand made marbled end pages in an accordian bind of 6 - 30 page signatures then again bound to the leather. The paper was water marked and 100% cotton rag with proper grain cuttage. It was marked $70. I finally walk over and chat about - "Do you journal?" and then we go there or not. He responded, "Why does this journal cost so much?" I was a bit taken aback and said, "Well, I guess I thought it was worth that." We continue on in chat and talk about his journals, hand written words, etc., and I came upon asking him what he does for a profession. Without hesitation, I found out that he was a pediatrian at the big hospital in the area. The following words just popped out of my mouth.

"Why do you charge so much?" We continued to chat as if I had said nothing. He didn't buy a journal and I am not sure he ever understood my question. ;-)


I think the best chat and laughs and good times came from 5 young theatre people doing something with the play "Wicked" in town. After it all came to pass and it was found to be so-I held my heart and exclaimed, "Oh my, then you know Elfaba?"
I showed my great flair for drama and almost wept. We all smiled and it was good.

They were young graducated "hope to bes" with grand plans and adventures and they each felt sure their turn was coming soon. I wished them all great luck and one young girl bought a small brown leather accordian journal that she most likely could not afford.

Funny how things go round.

It was wonderful to be in the artist environment again. I hate to be out of doors but I so miss the strolling street art shows where so many attend to try to win the prize money. It draws out those who might not sell their work and deserve recognition. Keeps the work fresh as well. The energy is strong there. So much art made through expression. Two old potter friends were across from me and down. One was doing mixed media now with these wonderful nudes (the other potter and myself who know this potter's wife thought it looked a bit like her.) He then produced an image by layering negatives and then developing them. These photographs were then formatted into these very large and interesting vessel forms that were altar looking. Much like his pottery. It is interesting how no matter what medium one works in, the work will have such strong traits and similarities. I heard him say over the course of Saturday - "this is analog all darkroom no Photoshop here." Interesting how we value how things are made .. -it all felt so good again. Much of the work at this show is new and innovative. Many young people showing and as the judge so awarded a great diversity in those presenting the art.


We attended the award ceremony that evening and chatted with some old friends, listened to way too loud music and watched as the artists so proudly accepted their awards. Six awards were given to young artists who are hoping to follow in some of our footsteps. It is always good to see the youth who realize that this is not a way to find wealth or fame, but a place to grow spiritually through the creation of energy that grows so rapidly within us. It is all good. At this show, unless under some strange conditions, most awards go to 2d art. There is the Mayor's Award and even one award that goes to drawings only. The booths who brought their drawings-so few-but all very exciting.


The rain began to fall heavily, again, so we left-tent well secured and knowing that tomorrow was going to be more of the same.


I learned something of great fortune from this judge. She gave an award to a sculptor and said that one reason that she was drawn to this work was that the booth was minimal. At first, I thought, what does she know it is a place to sell, put it all out so they can choose. Perhaps after thinking back to carrying podiums around to set baskets upon at the old fine art shows , I had to with personnal disappointment agree with her -she has a point. Hearing her voice repeating this comment over and over in my head, I realized that I had joined the ideas of "the market" and needed to revamp my display for my next shows. It is always good when we learn by listening deeply to others and then seeing if any of their words can be used to help us in some way. I set up my gallery room and think the mixing and matching and fewer items is a better way for enjoying my work. It is all good.

Sunday morning we arrived in rain and many tents with standing water. My booth was very secure and dry-the trimline served its purpose as did our little boot. The foundation volunteers and workers immediately started handing out huge bags of mulch in hopes of solving a problem that already was too deep to fix. The show was called at eleven on Sunday morning and we all slowly and completely soaked worked our best to save our product and load up and prepare for the drive home.
Heaters on -wet clothes off. Kind of like the wax on wax off thing.

So there ends another saga of a show weekend in the rain. Looking back, I don't like shows in the rain-but oh how the outside art venue captures the essence of what we are. It is a crap shoot!! Even in the rain, it felt good.

See you around town soon,
in an another adventure,
waves from her car and she drives by,

Janet

Tuesday, April 21, 2009

THE UNFINISHED WEDDING BOOK

Well while chatting in the cafe today, we were all discussing ATC cards and such and up came a comment about the unfinished wedding book that I started some time ago for my nephew and his new bride. Right before the book was to be finished, I heard that they were going to travel for a year so I thought a travel journal would be more fun to have so the rest is history. This little book (a book before I knew that I would come to make books) has just sat on a shelf never to be finished and never to be seen. So here she is:

THE UNFINISHED WEDDING BOOK

First page - not the cover - that never seemed to have gotten made.


Second page of the book - the engagement. This page has places for little stories that tuck away and little picture holders to place their own and a nice quote only a bride would tear at.

On the third page, the theme of how much can one manage to put on one page begins to unveil itself. As you can see, my love for using transparent papers for words and pictures has already started it's development.

As each page continued, new ideas needed to be formatted to add excitement and interest to the readers or viewers so this next page came from typing the same word over and over and then snipping them apart. Each tiny piece was then laid and glued to form the heart. It was actually a rather fun project. This page is a bit sweet for me, but looking back at a bride to be-nothing can ever be too sweet, romantic or wonderful.


The "Wedding Day" is approaching and this page is for those private pictures before the two have joined in matrimony. Oh my, this blog sure is sappy, but some fun stuff. Lots of little envelopes are included in this page to include the vows each will give to the other.


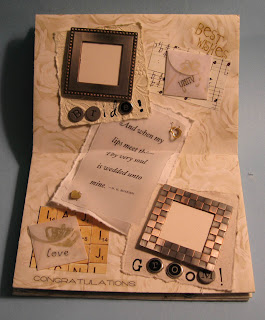
This last page just goes on and on. This page was fun to hammer out the little heart signs and to use the old slide holders for pictures. Each picture frame is for a special moment during the ceremony and once again a quote that only on a wedding day should be read.

One last hidden place to be found in this little book. The book was constructed to include an envelope behind each page, that was to be discovered by opening the spine of the book. If you didn't get the picture don't worry-it never got made either. The next shot is of those envelopes and as you can see, even little quotes were hidden in there.

If the book was ever to have been completed, there would have been a few more pages that now remain blank. The service, the reception, the honeymoon and the first apartment would have been included on the last of the pages. Thinking about all that stuff makes my head spin and perhaps that is why it was never completed. Who knows why art people never finish some things. Shrugs.

So here stays the old maid. She almost made it to the alter, but not quite. She continues to live with her mother who tells her that she was too good for any wedding anyway.

Hope you enjoyed the picture page.

See you around town,
Janet

Friday, March 20, 2009

Do you have a needle and thread? Time to sew up signatures.

Today I finally finished the sewing of signatures. It is most likely the least favorite thing that I do in the studio having to do with the reconstruction of old texts. I will try as always to remember all the details, but as I mentioned this is not my favorite part.

First of all a signature is a series of pages that fold together to form part of the book. If any signature is more than four pages (signatures are always mulitiples of 4 if you have not guessed by now) it must be sewn together to hold the pages in place. Once the sewing is completed, the signature block is then covered as was mentioned in an earlier blog. Let's start at the beginning.

After the printing of the pages, I then determine how many pages are in each signature, count them out and fold; creasing each one with a bone folder. I tightly wrap them in waxed paper and into the press they go. Each book is kept together and placed back to front to make them even during pressing. It is important that I take my time when folding. I use a bone folder to crease each fold and pay close attention to making sure it is square prior to using the folder.

Next step deals with math again. I will try to explain it easily without using too many words. First of all, one always thinks in what is called stations when sewing signatures. This is a set of two holes (in and out- back to the beginning) and is always used when there are more than 4 pages in a signature.

So where would you put your holes? Perhaps it is a good time to note that I am not schooled in book arts, I have read and reread and experimented and figured it out for the most part, so in many cases what I do is not always text book correct. Just thought you might like to know. ;-)


Now, where was I, oh where to put the holes. This is what I do and it seems to work pretty well, eventhough the stations are larger than my tapes, it all works out. Uusually, I can wait in the sitting room or sit in the waiting room and in the end I end up in the same spot so this is how I do it. I like to have about .5" to .75" for my first hole of the first and last stations. These are the holes that start from the top and bottom edge of my text. So, I must first add in the amount of paper I plan to trim off from each side. If that amount was to be .5" and I want my first station to be .5" from the edge of my text- my first hole of the first and last stations would be 1" from each end of the sheet of paper used to print the text. Note illustration. Next, I move my ruler so that it starts at that first hole and measure. In this text, I will have 3 stations or 6 holes. Two holes have already been determined so 4 holes are left. If the distance is around 5 inches or so. I make each station 1inch. Second hole of the first and second hole of last station will be one more inch in. After finding the center mark I use that as the center to determine where the last signature holes will go. I make a mark for each hole on either side of the center mark. I don't know if I understand what I do either, but it is a start.


The text then goes to the cradle for hole punching. The folds that were so carefully made earlier make this job come out more precise. I place the signatures inside of each other, checking to make sure they are even and square. When they look good, I place the sheet of paper where I want to punch my holes on top. Next, I use a little tiny drill with a very small bit to drill my holes. Most instructional books will say to use an awl; however, the tiny drill works well for me. The signatures are now ready to go to the sewing station and be sewn together.

Books are usually sewn at a sewing station. This tool has been around for a long time and still works pretty much the same way as the original designs. Signatures are sewn together and on tapes. The linen tapes and linen threads used to put the text block together are strong and do not stretch so the book stays in proper shape for a long time. The tapes are used to tighten the signatures and then frayed to be glued between end pages and covers. For informational purposes, I inherited this lovely tool and I cannot find the exact set up so I figured out how to make it work for me so if it does not look correct, it most likely is not correct. ;-)

Where do you start to sew? I start at the back of the book and move forward. I turn the book over and then place the back page on the bottom and the folds laying next to the tapes. The tapes have been lined up so when the thread is on the outside of the folds the tapes will be included in the sewing.

Now, that I have sewn to the top of the text and my needle is on the outside of the book, how do I attach the next signature. To hold the ends together of that and the previous signature, a half hitch knot is done behind the previous signature. After this knot has been made, I just add another signature from the pile and continue. If I run out of thread, I use a fisherman knot or perhaps it is called a book knot to put the the new thread on and then clip the threads about .5" from the ends. I do not think that these knots detract from the book when they are seen during reading. It is just part of being handmade. I do not want to have too many knots on the back of my book as I want this to lay flat against the spine. Oh, no wonder so few make books. Anyway, the books have been sewn and taken off the sewing stand. The tapes have been cut and each book is then once again wrapped in wax paper, squared up and placed under my favorite heavy books, the Oxford English Dictionary.
It will be another process to add some endpages and make the covers, but if you keep tuned in I will have pictures before too long. Tomorrow is going to be a break day and I hope to do a couple of silks.


Well see you all around town,

Janet

Tuesday, March 17, 2009

Ready, set go- let's make a cover for a book.

Doesn't look like much but with what I did today, I could even make some new covers for those old fairy tale books of long ago that seem to have lost their fronts or backs or just are like wobbly old teeth. Using book cloth and the signature blocks I spoke of in my last blog, today I will finish up a series of books right down to signing a colophon to make it all official.

Before I started working on my covers, I unwrapped the signatures from yesterday and found them to be nice and square and the glue had hardened well. Since the signatures were larger than the actual size that I wanted for my books, careful measurements were taken and then the books were trimmed to size. A very sharp xacto knife will work, but after throwing too many blocks in the trash, I found a large size cutter to make my edges nice and clean. Now that the books have been cut to 6.75" x 6" it is time to choose some book cloth, cut the boards and spine and put it all together.

Lets cut the book boards. First one measures the book or signature block very carefully. The example today will be 6.75" wide by 6" tall. I will be using these measurements to determine how large the book board will be. The width of the book board will be the same measurement as the text block is or 6.75." The height of the board will need to be larger so the edges of the books will be protected from dust and well it just looks better when there is an .127" on both the top and bottom of the board. So, yes all that is needed is to add .25" to the height of the book block or 6 .25. " (If the measurements are close as in this book, I will put arrows denoting direction on the book board- you guessed it- too many times I have tried to glue the text in and found I had - well you know what I mean ;-) ) Two book boards-front and back- are cut for each book. Next the measurement of the spine is taken and another very thin piece of board is cut- almost like double weight card stock to add support to the spine. The measurements for the spine will be the actual width of the spine block and the height of the book board not the book block. Remember check things out before cutting. The width of thin books is determined by laying the back or spine on the thin weight board and draw a line on each side and then measure and draw nice straight lines. Scratches head. I hope that all made sense.

Most any kind of paper will make a nice book cover, but I prefer to use book cloth for one reason or another. When I make up some artist sketch books, I will choose wonderful handmade papers to add to their beauty, but in most books book cloth gives a very professional addition. Book cloth comes in many forms, some backed and some with only starch as a stablizier. The backed linens are very easy to use but one gets a better fit with starched, but it can be cranky. The width of the book cloth will be as follows. 2 book board widths, the spine width plus .5 " plus 2 inches. For this piece that will be 6.75" + 6.75" + .25" (that is the spine width) + .5" (when we lay it out this .5 " will become a gutter of .25" on each side of the spine) + 2" that will be used as a fold back onto the board. When I do the math the width of the book cloth should be 14 .25". The other demention will be the height of the book board or 6 .25." To that measurement add approximately 2" for turn ins. So the piece to be cut would be 14 .5 " by approximately 8 .5."( I could add a little more, but not less.) Now, if this was just too confusing, I just lay all the parts plus the gutters on the book cloth give .75" or so on all sides to fold in and cut. Check the illustration above.

Oh, this is always a favorite part for everyone. Let's use glue. When using glue, first of all make sure it is in a consistency that spreads well, does not soak the paper or fabric. Gluing is supposed to be done in a circular motion-from center to edges. This can be a bit tedious on larger sheets that are not square, but start out in the middle and then wing it from there. Once the paper or cloth has been covered with glue, the paper or cloth will begin to curl. This is very normal and if you wait for just a bit longer, I have heard that it lays back down. I never seem to wait that long to see if that is true.

Before applying the glue, I make two tiny marks at the top and bottom of the cloth where the spine will be placed. Now, I apply the glue and place the spine right down the center leaving the turn backs equal on top and bottom. Next, the boards will be laid on the glued up cloth .25" from the spine. This is important and needs to be a nice straight equal distance from top to bottom on each side. I then place the boards down, press lightly and turn back the edges of the cloth onto the board. I like to make little squares at the corners so it looks nice. Laying the cover down and letting it dry well before gluing the text block in.

Here are two finished covers with the signature block in the background. The white is the spine.


The signature block will be glued into the cover when the cover has been left to dry. I take the cover and place the signature block into it so the spine fits snuggly to the board spine. The bookis put together and to see how it fits. The end page will be glued to the edge of the cover .25" in (this is the side edge.) The top and bottom edges will be .127 or close. A scrap piece of paper is put between the two end pages so when you put glue on that back page it will not get into your text block. Once the glue has been applied carefully, I slide out that sheet and put it right away in the garbage. Glue can be my worst enemy when Iforget to cleanmy area. I always have a damp cloth near by for fingers, table and rulers.

Next I place the end page gently on the board and then pressing the end page firmly into the book board checking all your edges and making sure they are nice and straight. I continue in the same manor for the back end page. Now, I take my finger and go back and forth on the gutter areas making sure they are straight and have no wrinkles in them.I Run my finger back and forth making a slight indentation. This is the hinge of the book and some detail should be spent on this.


It is really nice to have a crimping setup for the hinge. If you notice in the above illustration the spine of the book is sitting ouside of 2 brass plates that fit into the gutter to crimp the book hinge together. The book is left in the press until the glue has set in order to get that nice crimping for the hinge that makes the finished piece look so professional. Add a nice title page, sign the colophon and this mission has been completed. Now if only these were the only books I had to make. Over the next several days, I will continue to work on my reproduction titles. I believe the next blog will be on sewing up signatures or how about how to make an artist sketch book.


Well, it will give me something to think about as if I need to think more. So until then find peace and kindness or give it a whirl and if not-

See you around town,

Janet

Monday, March 16, 2009

Putting together a signature block.


First what is a signature block? A signature block contains the insides of a book, to include -signatures composed of pages and end pages that help hold this all together with the cover-that is what I am going to chat about today.

Ok, first of all, one has to understand how to lay out the page order in a given number page signature, but lets start out really easy and do a folded page signature or a 4 page signature.

My laser printer takes a legal size sheet of paper so I start with a layout of 8.5 x 14 to include margins, gutters and a cutting edge. (If saving in some word document you can save so each page is how you want it to print out in your book.) Next, I print the book using a two sided printer that is set in preferences for printing on front and back. This is a life saver; how I hated turning papers and getting them mixed up- oh I know that drill!


The picture above is of folded signatures. There are 2 pages printed on each side-1 and 4 and 2 and 3. I fold the pages in half and stack so the first page lays flat on the table and so on to keep the correct order. I then wrap each one with waxed paper and then off to the press while I cut the end pages.


End pages can be almost any kind of paper, in this particular book, I use a flat black linen paper as the story is about a crow. There are many ways to attach an end page, but I find using another sheet of 8.5 x 14 works very well. After thes pages are folded, they are incorporated as 2 additional signatures to the text block. If one were to use this idea when making an end page, remember that both sides of the paper will be seen so remember that when choosing.


All folded up and waiting for glue and something known as "super." Super is a loose woven linen that is glued to the back of the sewn or tightly held signatures to hold it all together. This backing is glued partially to the end page then around the folds of each signature and then back to the back side of the other end page. (A very proper super would be frayed prior to the gluing of end page to cover.) In these next pictures, look closely how I perform the gluing of a single sheet signature block. I first glue the super to the back of an end page and then across the back. I place enough glue to penetrate the pages but not so much that it will interfere with the turning of the pages. The super is pulled across the glue, stamped a bit to make sure I have a flat back and flipped over and using my thumbs it is pulled tight. So tight that the glue comes through the back of my super and the piece is nice and square. I place this on a sheet of waxed paper and make a nice wrap to keep it all in place. Then under my last press- resting while the covers are put together. It can be noticed that these blocks are not put into the large press, but left under some heavy books. The big press is a bit too heavy and this can cause the signatures to slip a bit-making your book more of a trapazoid than a square or something like that.


Next comes putting the cover together but that will be another blog. See you then.
Thanks for stopping by and
See you around town,

Janet

Friday, March 13, 2009

Going to finish up those lanterns.


Welcome back.

The boxes have been covered and are waiting for the image. There are several ways I provide images one is by using some beautiful papers (I test out to see how they will look behind light) and I use images from where ever I can find them. If I found an image that I knew was copyright free, I could bring it into photo shop after scanning or dowloading from a cd and make it the right size through cropping and such. Many of the images that I use are from old books and designs that need a great deal of work to bring them to their original format so at times hours upon hours are spent cleaning up old works. After measuring my openings in my lanterns, I resize the image and prepare it for printing.

I use a laser jet printer, as toner does not fade and inkjet printers do. I use a translucent vellum type paper (it is really plastic I think) to print on that really makes them "POP" as the elusive they say. After printing, (before I print on the exspensive paper I make sure it is going to work by doing some preprints on regular paper) I dab some glue around the inside frame opening and place that image in. This is done very carefully. Just a little tap into place at first and then I check out how it looks. This paper and glue make it hard to move once it is down so to check it out first makes for happier moments. When using papers not vellums I am very careful as the paper can be very fragil and I don't want to tear it. There all done, starting to look like something.

To finish the boxes, I first put a inner lid of book board in the top so the top of the boxes will have something to be glued to and to stabilize the box. Measurements of the box and plus I add one inch per side for overhang and cut two, cover and make sure one has a hole cut out of it. After the cloth has dried, they rectangles are glued to top and bottom with a heavy book on top so the top and bottom are nice and flat and glue up well.

The final touches are the balls that have been painted red first and then gold. Not hard to figure out where to glue them. When ever I paint anything gold I first coat them with red -I read that somewhere. ;-)
Put in one of those little lights that have a 4 watt cool bulb inside.
Bingo - I have lanterns.

There are lots of ways to finish up the lanerns-that was just one way. The covered boxes that aren't quite finished will have some dowels up the sides and through the top and bottom lid pieces and who knows what I will do with them then. Stay tuned and if not-

See you around town,
Janet

Thursday, March 12, 2009

Just had to do another silk.


Yesterday,I got several of my boxes filled with their images and they are now ready for the final cutting of tops and bottoms, placement of feet and topper and then they will be completed. Still a lot to do though isn't there? Well, before I get to all of those busy steps, I just have to work with some silk. So here I go.

First, I wash my silk in advance according to directions in case there is any residue on them that will keep the dyes from penetrating the silk.


Next, I pinned my 36 x 36 china silk square to my frame,
which has some problems, but I am still in the early stages
of this new passion so I think this will do it for now. I use stainless steal pins just in case I get a bit of rust that will slip into my silk.


After pinning, I chose
my dyes. I have chosen 3 for this piece, my favorites- cyan, veridian
green, and magenta. I deluted my dyes 1 teaspoon to about 3/4 cup of water. With the pr
ocess of layering colors I don't want to start out too dark.

I layer on the colors letting them bleed together and then apply several applications of salts, alchohols , and dyes. This is the final stage of the piece and is drying with salts.
The three pictures on the sides are in the following stages:
top: ironed off the stretcher and ready for steaming.
middle: stretched and dried
lower: last layer to include salts
Well, that was a lot of fun for me and I believe I like this color combination enough to make a garment out of. So the next adventure in silks will be for me to dye up some yardage. Stay tuned and if not-
See you around town,
Janet

Wednesday, March 11, 2009

Let's make some paper box lanterns.


This episode of my blog is about making my lanterns. They are just little light boxes made from book board, book cloth, wooden knobs, a light and some wonderful out of date images that I collect from old resources and from the many copy right free books and cds available today.

First things first. Decide how large one wants the box and then cut out the boards. (The bottom board will need a hole cut out so you can push the light up.) After the boards are cut, you have to determine how large the frame opening will be and make each board into a frame. Once that has been completed, time to glue up the sides to bottom. I always do this on a scrap piece of paper and I do not worry if the boards and paper get glued up. I will tear off that paper later prior to adding the book cloth, but to begin with it adds a bit of stability.


After the glue has set, it is time to cover the boxes with cloth making them ready for the image.
Be careful as you apply glue to your cloth- do not get any glue on the front sides or it will live there forever. Take your time-and remember when glueing, don't let the glue be too watery or too thick. The little bear said this one is just right. Wrap the box with the cloth folding in the bottom and tops and don't worry about your windows just now. That cloth is still damp with glue and will be very hard to cut into. Sit the boxes to one side and do a little chatting on your face book page while you wait.


That was fun. Now back to our boxes. If the glue is dry, it is now the time to prepare the openings for your images. Take your knife and make sure you make a cut in each corner of the cloth up to the points where the squares meet. Then cut out the extra cloth in the middle, apply glue to the board not the cloth and turn in. Once again be very careful not to get glue on any cloth that is seen by the eye. Glue makes ugly marks on your cloth and well you might get some of it off, but when it drys it will come back. Like a bad penny I have heard.


Well, that is enough of a project for today. Below, are some of my boxes that I covered yesterday and today I will place the images in. Tomorrow my blog will be about what ones does with an image to get it right for the box. Hope you join me then, but until then-


See you around town,


Janet


Tuesday, March 10, 2009

Some new silks.


Over the course of time, it will be noted that I do many things. Now, do not misinterpret that I do things well-I just said that I do many things. The new passion in the studio is the dyeing and painting of silks. At the end of this dream, I see clothing constructed from my designs; however, as I am currently stumbling along, that dream might continue to be just that for some time to come.


I have been obsessing over silks for over a month now and have experimented with gutta and the laying of dyes as if one was watercoloring. Dyes must be fixed in a steam bath to make them permanent and that led to the making of the steamer. Now, that the steamer has been perfected my silks are now completely finished and ready for a little display.
These are very early and experimental works,
but some aren't but so bad.
See you around town,
Janet